ShopDreamUp AI ArtDreamUp

Deviation Actions


Suggested Deviants


Suggested Collections


You Might Like…


Description
Original Size: 7.5x10
Medium: Ink, Water-dyes
Copyright Notice: 2008 by Bob Giadrosich/Sharayah Press. All Rights Reserved. Unauthorized reproduction prohibited by law.
Tutorial: Part One, Concept
Tutorial: Part Two, Pencil Outline
Tutorial: Part Three, Pencil Detail
Tutorial: Part Four, Ink Brush Work
Tutorial: Part Five, Ink Quill Work
Tutorial: Part Six, Under Painting Violet
Tutorial: Part Seven, Under Painting The Blues
One's approach to color needn't be complicated nor intricate, just planned out. While I admit that my area of expertise lies more with ink, I’ve been painting with oils for over 20 years and with water color and dyes for longer.
Many artists that I know who paint for a living understand color much better than I. They could tell you all the combinations that will give you the desired results; such as what colors, when placed side by side will vibrate, or what to do if you want an object to glow or if one is trying to elect a certain emotion from the viewer, etc. My love and passion has always been centered on lines. It’s the way that I see the world around me, studying form over content. For me, color is a much more intuitive process. I select the colors that I use because I like them, and if it works, great! If it doesn't work, I still use them, because as I stated, it's what I prefer.
I am by no means an expert on color, just an artist who enjoys a challenge, whether it's on a 4x6 foot canvas or a Hello Kitty coloring book. That being said, the following observations come from listening, reading, and practical application.
Concerning Color
Without getting into the physics, the colors we see are affected by reflection, moisture, refraction, and diffusion. There are no pure colors in nature, but depending on the time of day, season, and geography, color takes on the characteristics of local light which gives each region on earth its particular hue and shade.
If your painting calls for a warm light source, such as the sun or a hot light, then the shadows thrown will be cool, and contain blues, purples, and greens. If the light source is cool, such as moonlight or a bluish light, then the shadows will contain warm colors. This can be most accurately observed in nature, for no shadow is truly black, but will have a myriad of colors within the shadow. The eye must be trained to see these colors.
The highlight should always be the brightest part of your object, and is rarely white, unless it is the glare of the sun or light on a metallic surface, rather, the highlight will bring the value of an object up a few shades, and that will act as the highlight.
For example, yellow sun on a brown tree will bring forth tan highlights on tree bark. Highlights on a green leaf will give forth yellow-green highlights. Transmitted or direct light is of a warm tint, reflected light is cool in color. Snow is never white, but takes on the color of sky, water, trees, and whatever object is on it as light is reflected from that object onto a neutral base. Freshly fallen snow will be more colorful than snow that has been around awhile, because the edges of each newly fallen snowflake acts as a prism, while old snowflakes have softer edges.
Each color will change as a different color is placed beside or in close proximity around it. Whenever two or more colored objects are grouped together in a fairly good light there is almost sure to be an interplay of color between them. Each will splash some of its own color on that of its neighbor. The greatest "color splasher" of them all is the sun. A yellow sun will tinge everything yellow. An orange sun will give everything an orange hue. In the same way, dazzling sunshine, pale sunlight, cold, clear greyness, heavy murkiness, reflections from the blue sky, and reflections from sunlit cloud all combine to affect color differently.
White paint does not make an object brighter in a painting. It merely lightens the value of an object. White actually dilutes color and destroys its purity and richness. White pigment should be reserved for the absolute pinnacle of the highlight and should be applied as is.
Because of a term called absorption (which is why objects are seen as the color we see them), color mixing and light mixing are not even close. For example, blue and yellow lights, when mixed, will produce white, but when blue and yellow pigments are mixed, they produce green. If you mix blue and orange pigment, you get grey. It becomes what illustrator Larry Elmore describes as a non-color, and is an excellent way to make trees recede into the distance in an outdoor painting. Every landscape has a dominate color. All other colors present in that landscape take on the role of an accent.
Besides hue (the quality that distinguishes one color from another), color has two other important qualities: value and intensity. Value is the amount of light or dark in a color, and will decide how bright that color appears in relationship to the other colors around it, and intensity is the quality that distinguishes a strong or vivid blue from a weak or dull blue. Each of these qualities: hue, value, and intensity, are separate and distinct. The hue of a color can be changed without changing its value or intensity. The colors value can be changed without changing its hue or intensity, and its intensity can be changed without changing its hue or value.
For example: a monochromatic painting has only one hue, but the same color can have different values and intensities.
One could spend a lifetime trying to paint all the color variations in the sky, and never capture them all.
Now, onto the Tutorial proper.
Colors Used in Order of Application:
Browns
PH MARTIN'S: Sepia
LUMA: Antelope Brown
LUMA: Tobacco Brown
LUMA: Golden Brown
Greens
LUMA: Moss Green
WINDSOR & NEWTON: Juniper Green
PH MARTIN'S: Saddle Brown
PH MARTIN'S: Ice Green
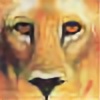
Finally, we have arrived at the application of some true color! Because of their concentrated color, the water dyes almost have three values. When used undiluted (not recommended, as they will stain the paper and not blend) they are very dark. Add a little water (recommended) and they take on a mid-range of intensity. When used with more water than dye, they almost act as a tint. This is very useful when building up layers of color to achieve a rich, saturated hue.
The first step in this stage was to start laying down the Sepia tone very lightly over the blue areas, paying special attention to apply it in the lined areas to increase the depth. Because the Sepia is a dark brown, it helped to start giving the areas a nice shadow base. Mostly, it was laid down where the rocks on the wall join. This was to push these little nooks and crannies in the wall back, while allowing the detail in the rocks to come forward in contrast I went over the same areas a few times, building up the Sepia tone just to where I wanted it.
After that, I used a medium strength Antelope Brown on the surface of the rocks themselves, dry-brushing some of the fine lines to start defining texture and separating the details. I still draw the dye from my water/dye mixture on the pallet, and very rarely allow undiluted dye onto my brush.
Tobacco Brown has a greenish tinge to it, so this helped to bring a little bit of a green into the rocks which will complement the green leaves in the composition, harmonizing these areas to the eye. The last brown that I used was a Golden Brown, which I applied fairly heavy. This can be seen in the image as the heaviest color in the faces and along the rocks. After that, I went back in with the Antelope Brown, tinting the rest of the wall (the very light color on the left side of the faces and along the wall). This served to knock back the white of the paper, and to once again unify elements of the composition so the viewer is seeing the wall as a complete object, and only upon closer inspection noticing the details.
On the right side of the figure, I primarily used the Sepia, as this area is in shadow. A small touch of Tobacco Brown and Golden Brown were used to bring some of the color from the rest of the wall into this area, but I still wanted it to remain in shadow.
In later stages, some reds and blues will be introduced onto the rocks, which will give them more of a granite appearance.
For the greens I used Moss Green as the under tone for my leaves. This is a rich, darker green which I felt I could lay the other colors on top of and still have the Moss Green show through a little. Next came the Juniper Green, which is more of a blue-green. If you study the composition, you can see where this has given many of the leaves a bluish tint, especially in the shadows. Third, the Saddle Brown (which is actually more green than brown) was layered on, and finally, for the mid range highlights, an Ice Green was used (the lightest hue on the leaves). All of these colors were applied fairly light, as I want to come in later an use a yellow for highlighting.
Method
One thing that I try to do is keep the application of the colors loose. I don't usually paint the whole object smoothly, but prefer to let the brush be a little more free-form, dabbing the color on instead of stroking it on. That way, whenever I apply another dye on top, it not only covers the layer of darker color underneath, but establishes little areas of independent color as it moves into uncolored areas of the object. This gives the look of mottled sunlight filtering through, perhaps, leaves and branches out of view beyond the borders of the picture. If you study the leaves, this becomes apparent, particularly with the Ice Green.
On the rock wall, I didn't want to cover all the blue areas, but allow some of the color to peek through. Later, I'll add some reds and a small amount of orange to bring more warmth into the areas. Another reason is because I have decided that the figure will be clothed in red, orange, and gold apparel to really lift her out of the background.
What you see here is the basic tones, and before the end, I'll go back in and tweak the colors here and there, darkening up some areas as needed in order to build contrast, but first I'll have to get some color onto the figure so that I'll be able to judge just how much more colors to add to the wall. For Stage Nine, I'll be laying down my foundation colors onto the figure.
Next: Red and Yellow and Orange, Oh My!
Medium: Ink, Water-dyes
Copyright Notice: 2008 by Bob Giadrosich/Sharayah Press. All Rights Reserved. Unauthorized reproduction prohibited by law.
Tutorial: Part One, Concept
Tutorial: Part Two, Pencil Outline
Tutorial: Part Three, Pencil Detail
Tutorial: Part Four, Ink Brush Work
Tutorial: Part Five, Ink Quill Work
Tutorial: Part Six, Under Painting Violet
Tutorial: Part Seven, Under Painting The Blues
One's approach to color needn't be complicated nor intricate, just planned out. While I admit that my area of expertise lies more with ink, I’ve been painting with oils for over 20 years and with water color and dyes for longer.
Many artists that I know who paint for a living understand color much better than I. They could tell you all the combinations that will give you the desired results; such as what colors, when placed side by side will vibrate, or what to do if you want an object to glow or if one is trying to elect a certain emotion from the viewer, etc. My love and passion has always been centered on lines. It’s the way that I see the world around me, studying form over content. For me, color is a much more intuitive process. I select the colors that I use because I like them, and if it works, great! If it doesn't work, I still use them, because as I stated, it's what I prefer.
I am by no means an expert on color, just an artist who enjoys a challenge, whether it's on a 4x6 foot canvas or a Hello Kitty coloring book. That being said, the following observations come from listening, reading, and practical application.
Concerning Color
Without getting into the physics, the colors we see are affected by reflection, moisture, refraction, and diffusion. There are no pure colors in nature, but depending on the time of day, season, and geography, color takes on the characteristics of local light which gives each region on earth its particular hue and shade.
If your painting calls for a warm light source, such as the sun or a hot light, then the shadows thrown will be cool, and contain blues, purples, and greens. If the light source is cool, such as moonlight or a bluish light, then the shadows will contain warm colors. This can be most accurately observed in nature, for no shadow is truly black, but will have a myriad of colors within the shadow. The eye must be trained to see these colors.
The highlight should always be the brightest part of your object, and is rarely white, unless it is the glare of the sun or light on a metallic surface, rather, the highlight will bring the value of an object up a few shades, and that will act as the highlight.
For example, yellow sun on a brown tree will bring forth tan highlights on tree bark. Highlights on a green leaf will give forth yellow-green highlights. Transmitted or direct light is of a warm tint, reflected light is cool in color. Snow is never white, but takes on the color of sky, water, trees, and whatever object is on it as light is reflected from that object onto a neutral base. Freshly fallen snow will be more colorful than snow that has been around awhile, because the edges of each newly fallen snowflake acts as a prism, while old snowflakes have softer edges.
Each color will change as a different color is placed beside or in close proximity around it. Whenever two or more colored objects are grouped together in a fairly good light there is almost sure to be an interplay of color between them. Each will splash some of its own color on that of its neighbor. The greatest "color splasher" of them all is the sun. A yellow sun will tinge everything yellow. An orange sun will give everything an orange hue. In the same way, dazzling sunshine, pale sunlight, cold, clear greyness, heavy murkiness, reflections from the blue sky, and reflections from sunlit cloud all combine to affect color differently.
White paint does not make an object brighter in a painting. It merely lightens the value of an object. White actually dilutes color and destroys its purity and richness. White pigment should be reserved for the absolute pinnacle of the highlight and should be applied as is.
Because of a term called absorption (which is why objects are seen as the color we see them), color mixing and light mixing are not even close. For example, blue and yellow lights, when mixed, will produce white, but when blue and yellow pigments are mixed, they produce green. If you mix blue and orange pigment, you get grey. It becomes what illustrator Larry Elmore describes as a non-color, and is an excellent way to make trees recede into the distance in an outdoor painting. Every landscape has a dominate color. All other colors present in that landscape take on the role of an accent.
Besides hue (the quality that distinguishes one color from another), color has two other important qualities: value and intensity. Value is the amount of light or dark in a color, and will decide how bright that color appears in relationship to the other colors around it, and intensity is the quality that distinguishes a strong or vivid blue from a weak or dull blue. Each of these qualities: hue, value, and intensity, are separate and distinct. The hue of a color can be changed without changing its value or intensity. The colors value can be changed without changing its hue or intensity, and its intensity can be changed without changing its hue or value.
For example: a monochromatic painting has only one hue, but the same color can have different values and intensities.
One could spend a lifetime trying to paint all the color variations in the sky, and never capture them all.
Now, onto the Tutorial proper.
Colors Used in Order of Application:
Browns
PH MARTIN'S: Sepia
LUMA: Antelope Brown
LUMA: Tobacco Brown
LUMA: Golden Brown
Greens
LUMA: Moss Green
WINDSOR & NEWTON: Juniper Green
PH MARTIN'S: Saddle Brown
PH MARTIN'S: Ice Green
Finally, we have arrived at the application of some true color! Because of their concentrated color, the water dyes almost have three values. When used undiluted (not recommended, as they will stain the paper and not blend) they are very dark. Add a little water (recommended) and they take on a mid-range of intensity. When used with more water than dye, they almost act as a tint. This is very useful when building up layers of color to achieve a rich, saturated hue.
The first step in this stage was to start laying down the Sepia tone very lightly over the blue areas, paying special attention to apply it in the lined areas to increase the depth. Because the Sepia is a dark brown, it helped to start giving the areas a nice shadow base. Mostly, it was laid down where the rocks on the wall join. This was to push these little nooks and crannies in the wall back, while allowing the detail in the rocks to come forward in contrast I went over the same areas a few times, building up the Sepia tone just to where I wanted it.
After that, I used a medium strength Antelope Brown on the surface of the rocks themselves, dry-brushing some of the fine lines to start defining texture and separating the details. I still draw the dye from my water/dye mixture on the pallet, and very rarely allow undiluted dye onto my brush.
Tobacco Brown has a greenish tinge to it, so this helped to bring a little bit of a green into the rocks which will complement the green leaves in the composition, harmonizing these areas to the eye. The last brown that I used was a Golden Brown, which I applied fairly heavy. This can be seen in the image as the heaviest color in the faces and along the rocks. After that, I went back in with the Antelope Brown, tinting the rest of the wall (the very light color on the left side of the faces and along the wall). This served to knock back the white of the paper, and to once again unify elements of the composition so the viewer is seeing the wall as a complete object, and only upon closer inspection noticing the details.
On the right side of the figure, I primarily used the Sepia, as this area is in shadow. A small touch of Tobacco Brown and Golden Brown were used to bring some of the color from the rest of the wall into this area, but I still wanted it to remain in shadow.
In later stages, some reds and blues will be introduced onto the rocks, which will give them more of a granite appearance.
For the greens I used Moss Green as the under tone for my leaves. This is a rich, darker green which I felt I could lay the other colors on top of and still have the Moss Green show through a little. Next came the Juniper Green, which is more of a blue-green. If you study the composition, you can see where this has given many of the leaves a bluish tint, especially in the shadows. Third, the Saddle Brown (which is actually more green than brown) was layered on, and finally, for the mid range highlights, an Ice Green was used (the lightest hue on the leaves). All of these colors were applied fairly light, as I want to come in later an use a yellow for highlighting.
Method
One thing that I try to do is keep the application of the colors loose. I don't usually paint the whole object smoothly, but prefer to let the brush be a little more free-form, dabbing the color on instead of stroking it on. That way, whenever I apply another dye on top, it not only covers the layer of darker color underneath, but establishes little areas of independent color as it moves into uncolored areas of the object. This gives the look of mottled sunlight filtering through, perhaps, leaves and branches out of view beyond the borders of the picture. If you study the leaves, this becomes apparent, particularly with the Ice Green.
On the rock wall, I didn't want to cover all the blue areas, but allow some of the color to peek through. Later, I'll add some reds and a small amount of orange to bring more warmth into the areas. Another reason is because I have decided that the figure will be clothed in red, orange, and gold apparel to really lift her out of the background.
What you see here is the basic tones, and before the end, I'll go back in and tweak the colors here and there, darkening up some areas as needed in order to build contrast, but first I'll have to get some color onto the figure so that I'll be able to judge just how much more colors to add to the wall. For Stage Nine, I'll be laying down my foundation colors onto the figure.
Next: Red and Yellow and Orange, Oh My!
Image size
671x900px 875.34 KB
© 2008 - 2024 giadrosich
Comments2
Join the community to add your comment. Already a deviant? Log In
I am in Awe of her.